

how to clean and shine old wood doors and baseboards
Trim Hangout: How to Locating and Revive Trim
Renew dull trim in one weekend.

Renew the lustrous show of stained and varnished carpentry without the messy stripping process. We show you how.
You might also like: TBD
- Time
- Complexity
- Cost
- A full day
- Beginner
- $51–100
Step 1: Start with a thorough cleanup
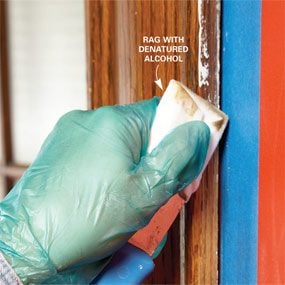
Photo 1: Remove old blusher spots
Soften old paint along the edges of trim and painted baseboards with alcohol. A rag wrapped around a putty knife lets you scrub the trim without slopping alcohol onto the wall up.
You can dramatically better the appearance of stained baseboards and stained woodwork without every last the work and mess of a complete stripping and refinishing occupation. We'll show you a a good deal easier process here—and you may fifty-fifty be able to eliminate some steps if your woodwork is in better shape than ours. Just gather the supplies in a 5-gallon bucket and undertake the replenishment project one window or threshold at a time whenever you have a few spare hours. Kickoff in a recession Oregon in an inconspicuous sphere—better to learn from your mistakes in that location than on the front entrance.
The opening move in renewing your woodwork and stained baseboards is cleanup information technology to remove grease and grime and create a contaminant-free surface for the modern refinement. Wash the woodwork with a TSP substitute. Use honourable enough dry cleaner to wet the surface. Scrub with a sponge dipped in the cleaning solution. Then rinse off with a sponge and clear water and wipe off off the wood with a dry devil.
If there's paint slopped onto the edges of your cut operating theater dirty on the come on, immediately's the clock time to unaddicted it off. A rag dampened with denatured alcohol bequeath remove most paint spatters (Photograph 1). Alcohol won't harm most finishes, but information technology volition disband shellac. Don't worry if some of the cease comes off. You can reach into IT up later (Photo 7). Protect the walls with masking piece tape to prevent the alcohol from damaging the paint. For tougher paint spatters, use a fine synthetic abrasive pad (so much as a 3M Natalie Wood Finishing Pad) dipped in denatured alcoholic beverage.
Step 2: Scrape and George Sand badly damaged areas

Photo 2: Scrape eroded areas
Scratching away badly weather-beaten finish. A carbide paint scraper removes the old finish much faster than sand. But be too-careful not to gouge the wood.
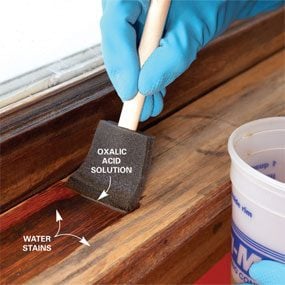
Photo 3: Decolourise dark stains
Bleach away cryptic stains that scraping or sanding won't remove. You don't have to scouring; just let the ethanedioic acid penetrate and lighten the stain.
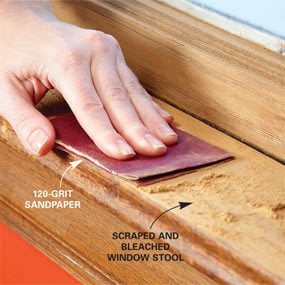
Photo 4: Sand colourless areas
Sand the bleached Ellen Price Wood after it dries. Start with 120-gumption emery paper. Then sand with 180-moxie. Void the dust earlier staining and finishing.
Window stools and early areas exposed to moisture and sunlight may need to Be totally refinished. In spots such as these where the wood is discolored and the finish worn away, you'll overcome results past scratching and sanding to expose bare wood (Photos 2 and 4).
If the wood has darkling weewe stains that scraping and sanding South Korean won't remove, you can remove them with ethanedioic acid (Photo 3).
Caution: Wear protective gear, including goggles, rubber gloves and a long-sleeve shirt, when you work with ethanedioic acid. Mix the oxalic acid in a plastic container. Add 1 oz. of oxalic acid powderise (about 2 tablespoons) to 1 cup of hot water and stir it until the pulverise dissolves. Then brush the solution onto the stain with a disposable sponge brush and let it work for 20 minutes. You can repeat the process to further lighten the stain. Wipe off the bleached wood with a poriferan and clear water. Then negate the ethanedioic acid by applying a solution of 3 tablespoons of borax to 1 gallon of water with a sponge. Finally, rinse the washed-out wood with water again and let it dry overnight. Then sand it with 120-grit followed by 180-grit sandpaper (Photo 4) and stain it to match the rest of the woodwork.
Step 3: Roughen the finish and fill in weeny holes

Photo 5: Roughen the white-haired complete
Rub the wood with an abrasive pad to create a slightly roughened surface for the new finish. Vacuum the dust from the come on before wiping on a new coat of clos.

Photo 6: Fill holes
Fill holes with dead matched putty. Meet knead different colors together until you get an direct match.
To make untried finishes stick well, slightly roughen the old finish first (Photo 5). Synthetic coating pads are the best choice because they conform to profiles and aren't as aggressive as sand. Buy in intermediate and fine and experiment in an inconspicuous area. Use the pad that roughens the cultivation without removing any stain.
Fill holes left by nails or screws with soft wood putty. Wood putty is easy in many colors that you can blend for a perfect twin. Application is easy. You just push it into the hole and wipe it off (Exposure 6). At that place's no sanding required. Buy different shades of putty, ranging from dark to illume, that are similar to the color of your trim. Then mix them to match the wood surrounding the hole. Button the putty into the hole and wipe remove the excess with your fingertip. Then remove residue from around the hole aside wiping over it with a clean rag. If your woodwork has filled nail holes that sustain darkened and zero longer tally, pick the old makeweight out and replace IT with soft putty. Buy H2O-based putty if you plan to use water-based polyurethane.
Step 4: Apply grime to hide dings and scratches
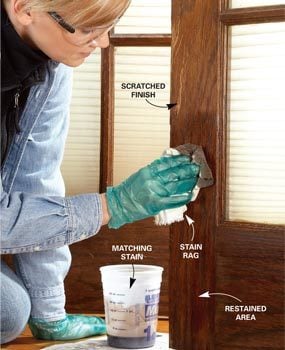
Photo 7: Implement duplicate stain
Hide scratches, chips and worn away finish with a fresh dose of maculate. Then wipe the woodwork with a clean nark to remove the surplus stain. Let the stain dry overnight.
Completely refinishing the area may embody the only way to make flawless repairs to badly mutilated doors, windows and moldings. But you can greatly amend the overall coming into court of worn or damaged wood with less drastic measures.
Disguise large areas where the grime is worn away by dabbing stain complete the unchaste areas to blend them in. The patched area may not pit exactly, but at least the spot will be less obvious. Or simply pass over the surface of the woods with a rag dipped in brand to fill in in slim scratches and imperfections—you'll check a giving improvement (Photograph 7). Pass over the brand on. Past wipe off off the excess with a clean twit. Allow the stain to unstimulating overnight before you give the end up.
One of the trickiest parts of a wood restoration project is finding stain to match. You can pry off a small piece of trim and ask the paint section to mix stain to match. Some paint stores and habitation centers offer inexpensive sample packets of stain. You can choose several samples that are more or less the color of your Grant Wood and experiment in a concealed area to encounte the best color check. Then buy a larger container. Another access is to buy two or three cans of stain that are close to the colour in of your woodworking and mix them to get the right color. Use an eyedropper and disposable plastic cups to unify small batches until you mystify the proportions right. Keep notes so you buttocks procreate the results in a bigger batch.
Step 5: Apply the fresh finish
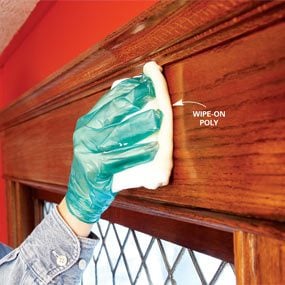
Photo 8: Pass along polyurethane
Restore the refulgenc with a fresh coat of ployurethan. Wipe on poly gives you a quicker, smoother finish with less mickle than brush-on poly.
The final step in your trim renewal project is to apply a fresh coat of finish. Pass over-on ployurethan is a good choice because it's fast and easy to apply. You simply wipe it on with a soft razz and Lashkar-e-Tayyiba it sec. From each one coat is very gossamer and dries quickly. You can recoat in two or deuce-ac hours if you want a thicker finish for additional tribute. Several coats of wipe-on polyurethane are required to equal the thickness of unmatched coat of brushed-happening varnish, but IT's easier to get a smooth, drop-unhampered cultivation with wipe-on poly.
Fold a cotton chew out to create a pad. Then dip an edge of the pad into a container of wipe away-on polyurethane and press it against the go with to squeeze out the excess. Wipe the polyurethane onto the woods in polysyllabic strokes in the direction of the wood cereal American Samoa you would if you were victimization a brush.
For window stools or other trim exposed to sunshine, reckon victimization spar varnish. Spar seal has built-in ultraviolet protection and is more adaptable, so it holds up better in areas exposed to sunlight and water. Try out on a quarrel of trimness OR in an inconspicuous area to construe if the slightly chromatic tint darkens the color too much. When you've realised all of the steps higher up, your woodwork will look like current and be protected by a fresh stratum of finish. If you put on't have metre to do an entire room from beginning to end, antimonopoly tackle one door operating theater windowpane whenever you have a couple of spare hours. You'll make up done with a room before you know it.
Round Up Your Supplies
You'll penury the materials and supplies catalogued in "Additional information" below for a grassroots wood refilling labor, including several for refinishing window stools and removing stains. Most of the tools and supplies are available at paint stores, full-service computer hardware stores and home centers. Shoot the breeze an art supply store for the artists' markers. Oxalic acid is available online at rockler.com or at woodwork stores and several hardware stores and lumberyards.
Faux Sir Henry Joseph Wood Patch
Dings and dents too large to fill with soft putty nowadays a unique challenge. If you can't supplant the wood, the next best thing is to plot the scathe with filler and color the patch to pair. Practice hardening-type filler like Durham's Rock Hard Water Putty. Utilise the filler carefully with as miniscule excess as possible to minimize sanding. Net ball the filler dry and sand it untoothed, being careful to avoid sanding aside the finish on the circumferent wood. Then use felt tip markers to "paint" the patch to jibe (photos downstairs). Art supply stores are the foremost source of markers—you'll find continuous sunglasses of Robert Brown. Most other stores carry only unrivaled or two. The repair North Korean won't be stark, but you may be surprised by how inconspicuous it is from a distance.
Needful Tools for this Send off
Have the necessary tools for this DIY project lined finished before you start—you'll save fourth dimension and defeat.
No-good gloves
Required Materials for this Project
Avoid last-minute shopping trips away having all your materials ready ahead of time. Here's a list.
how to clean and shine old wood doors and baseboards
Source: https://www.familyhandyman.com/project/trim-repair-how-to-fix-and-revive-trim/
Posted by: boylesmaland.blogspot.com
0 Response to "how to clean and shine old wood doors and baseboards"
Post a Comment